0%

1
2
3
4
5
6
7
8
9
NSTask *task = [[NSTask alloc] init];
NSMutableDictionary * e = [NSMutableDictionary dictionaryWithDictionary:[[NSProcessInfo processInfo] environment]];
[e setObject:@"en_US.UTF-8" forKey:@"LC_ALL"];
[e setObject:@"en_US.UTF-8" forKey:@"LANG"];

// [e setObject:@"zh_CN.UTF-8" forKey:@"LC_ALL"];
// [e setObject:@"zh_CN.UTF-8" forKey:@"LANG"];
//
[task setEnvironment:e];

中文字符编码问题
\xe5\x90\x84\xe7\xa7

添加上面的 environment 就可以了

前几日,同事 CM 合并代码后,运行工程,网络报错 ATS

1
2
code = -1022
The resource could not be loaded because the App Transport Security policy requires the use of a secure connection.

可是项目中info.plist已经添加了 NSAllowsArbitraryLoads ,网上查找了一大圈还是没有解决问题, CM 尝试删除了 info.plist 中另一个 key NSAllowsArbitraryLoadsInWebContent 居然神奇的好用了。

赶紧查文档,文档上就有说明

NSAllowsArbitraryLoads
NSAllowsArbitraryLoadsInWebContent

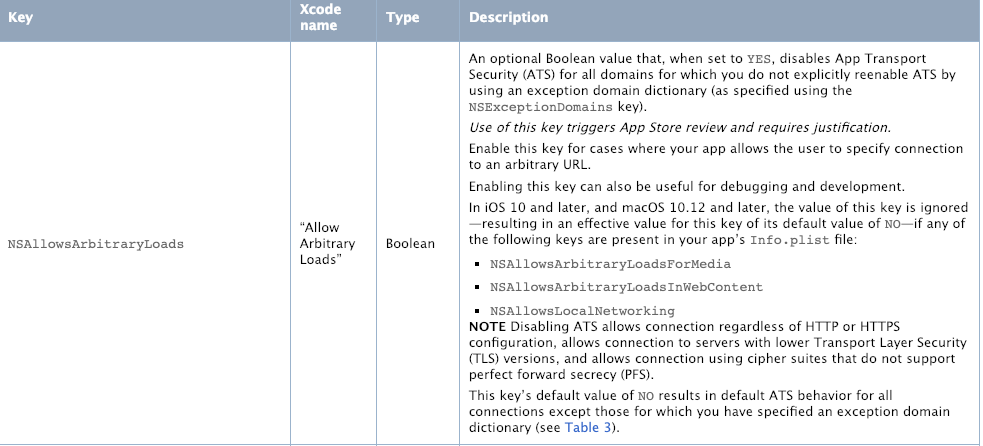
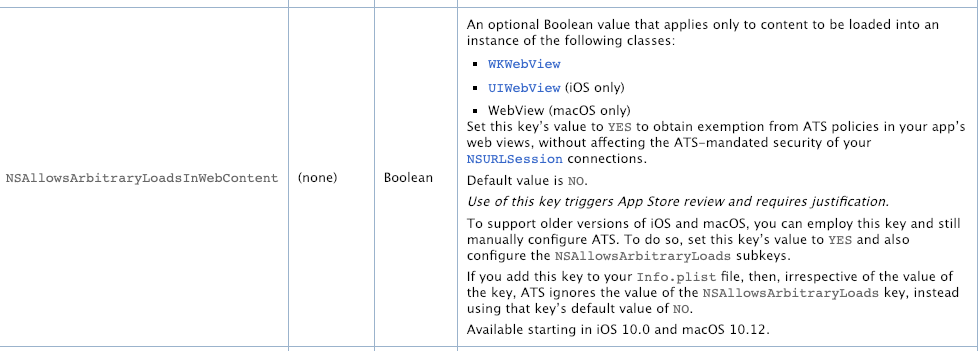
文档说的很清楚了,在 iOS 10 和 macOS 10.12 以后,只要写了 NSAllowsArbitraryLoadsForMedia NSAllowsArbitraryLoadsInWebContent NSAllowsLocalNetworking 这个三个中任何一个 NSAllowsArbitraryLoads 默认就为 NO 了,不管你设置的啥。但是还是一脸懵逼…

参考

在使用 NSOutlineView 实现文件结构目录的时候,发现在10.12以下版本,首次加载目录时候不能正常的显示出来,滑动一下页面就可以显示了。
当时使用的刷新方法是 reloadItem:reloadItem:reloadChildren:

NSOutlineView 是继承 NSTableView 的,所以就试了下调用了 reloadData 就能正常显示了,查了下文档,文档上就有说明

Important

It is possible that your data source methods for populating the outline view may be called before awakeFromNib if the data source is specified in Interface Builder. You should defend against this by having the data source’s outlineView:numberOfChildrenOfItem: method return 0 for the number of items when the data source has not yet been configured. In awakeFromNib, when the data source is initialized you should always call reloadData.

通过xib加载的视图,当数据初始化完成后,你需要调用reloadData正常展示数据

mac 上调试应用的 Webview 界面

开启方式

safari 开启 Preferences -> Advanced ->Show Develop menu in menu bar

运行方式

Debugger
Debug 模式下直接就能显示出来,选中就可以开始调试了。

但是在 Release 模式下,比如给前端开发的测试包,就没法使用了。在 Xcode 工程中的 LenovoBox.entitlements 文件中添加下面两行

1
2
<key>com.apple.security.get-task-allow</key> 
<true/>

performSelector 的一些问题

代码

1
2
3
4
5
6
7
8
9
10
11
12
13
- (void)methodNoReturnAndArgument {
NSLog(@"%@",NSStringFromSelector(_cmd));
}
- (void)methodNoReturnWithArgument:(id)obj {
NSLog(@"argument:%@",obj);
NSLog(@"%@",NSStringFromSelector(_cmd));
}
- (id)methodReturnWithArgument:(id)obj {
NSLog(@"argument:%@",obj);
NSLog(@"return:%@",obj);
return obj;
}

1
2
3
4
5
6
7
8
9
10
11
12
13
14
15
16
17
18
19
20
21
22
23
24
25
26
27
28
29
30
31

SEL sel1 = @selector(methodNoReturnAndArgument);
SEL sel2 = @selector(methodNoReturnWithArgument:);
SEL sel3 = @selector(methodReturnWithArgument:);
id obj1 = @"1";
id obj2 = @"2";
id obj3 = @"3";
id ret1;
id ret2;
id ret3;
void *a;
[self performSelector:sel1];
[self performSelector:sel1 withObject:nil];
[self performSelector:sel1 withObject:obj1];
// ret1 = [self performSelector:sel1 withObject:obj1]; // 崩溃
/// 接受参数错误
/// 下面这行转换就没有问题
a = (__bridge void *)[self performSelector:sel1 withObject:obj1];

// [self performSelector:sel2]; // 崩溃
/// 有参数去没有传
[self performSelector:sel2 withObject:nil];
// ret2 = [self performSelector:sel2 withObject:nil]; // 崩溃
/// 接受参数错误
ret2 = [self performSelector:sel2 withObject:obj2];

// [self performSelector:sel3]; // 崩溃
[self performSelector:sel3 withObject:nil];
ret3 = [self performSelector:sel3 withObject:nil];
ret3 = [self performSelector:sel3 withObject:obj3];

macOS WebView JSToNative

项目里通过使用的是WebView 并且通过 - (void)webView:(WebView *)webView windowScriptObjectAvailable:(WebScriptObject *)windowScriptObject 这个方法实现JS到Native的通信。

项目中代码如下:

1
2
3
4
5
6
self.mainWebView.frameLoadDelegate = self;

# pragma mark - WebFrameLoadDelegate
- (void)webView:(WebView *)webView windowScriptObjectAvailable:(WebScriptObject *)windowScriptObject {
[windowScriptObject setValue:self forKey:@"jsToNative"];
}

这样会形成循环引用,self => self.mainWebView => self.mainWebView. windowScriptObject => self

可以如下修改解决问题:

1
2
3
4
5
6
self.jsToNativeObject = [[JSToNativeObject alloc] initWithDelegate:self];

# pragma mark - WebFrameLoadDelegate
- (void)webView:(WebView *)webView windowScriptObjectAvailable:(WebScriptObject *)windowScriptObject {
[windowScriptObject setValue:self.jsToNativeObject forKey:@"jsToNative"];
}
阅读全文 »

GO 测试

Go 程序测试分三类,功能测试(test)、基准测试(benchmark,也称性能测试)、以及事例测试(example)

测试文件命名规范为要测试的文件加上_test后缀,即如果被测试文件为abc.go则测试文件名为abc_test.go

每个测试文件必须至少包含一个测试函数

功能测试函数,其名称必须以Test为前缀,并且参数列表只应有一个*testing.T类型的参数声明,例如 func TestHello(t *testing.T) {}

性能测试函数,其名称必须以Benchmark为前缀,并且唯一参数的类型必须是 *testing.B 类型的,例如 func BenchmarkHello(b *testing.B) {}

示例测试函数,其名称必须以Example为前缀,但对函数的参数列表没有强制规定。

在做文件系统的时候需要设置文件权限,之前都是用 NSTask 执行脚本设置文件权限,后来发现一个可以使用 NSFileManager 进行设置。
NSFilePosixPermissions

1
2
3
4
5
6
7
8
9
10
11
12
13

NSFileManager *fileManager = [NSFileManager defaultManager];
NSMutableDictionary *attributes = [NSMutableDictionary dictionary];
if (isReadOnly) {
// -r--r--r--
[attributes setValue:[NSNumber numberWithShort:0444] forKey:NSFilePosixPermissions];
} else {
// -rwxr--r--
[attributes setValue:[NSNumber numberWithShort:0744] forKey:NSFilePosixPermissions];
}
NSError *error = nil;
[fileManager setAttributes:attributes ofItemAtPath:path error:&error];

Linux一般将文件可存取访问的身份分为3个类别:owner、group、others,且3种身份各有read、write、execute等权限 - 没有权限
-rwxrwxrwx
8进制
r 22 4 w 21 2 x 2*0 1

-r–r–r– 0444
-rwxr–r– 0744

参考